Minor Wound Care
Managing Minor Wound Emergencies
Most wounds encountered day-to-day that require first aid are minor. They usually bleed very little, result in some minor pain, and generally heal quickly. A minor wound is rarely serious if properly cleaned and protected with dressings and bandages.
Some minor wounds do require medical attention for stitches or wound closures.
First Aid for Bleeding from the Palm
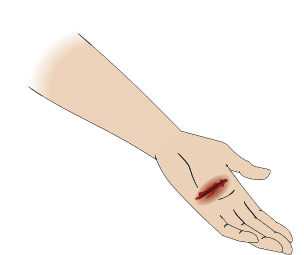
Wounds to the palm of the hand can bleed a lot and can be potentially serious due to the number of nerves and ligaments found in the hand. The palm of the hand is often injured by improper knife use in the kitchen, or moving items with sharp edges.
- Perform a scene survey.
- Perform a primary survey and expose the wound.
- Control the bleeding with direct pressure using a bulky pad over sterile dressings.
- Check the circulation in the fingers and compare it with the other hand.
- Bend the fingers over the pad to make a fist and bandage the hand so the fist is held firmly closed.
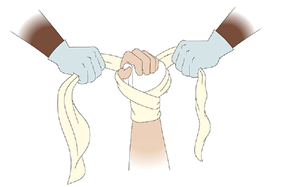
- Place the middle of a narrow triangular bandage on the inside of the wrist and bring the ends around the back of the hand, or start wrapping with a roller bandage at the wrist, and continue wrapping around the back of the hand.
- Wrap the bandage tightly over the fingers and then down around the wrist.
- Leave the thumb exposed, if possible, to check circulation.
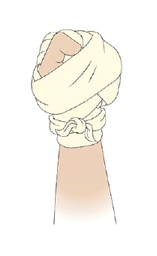
- Tie the bandage off at the wrist and tuck in the ends.
- Give ongoing casualty care, recheck the circulation below the injury, and get medical help.
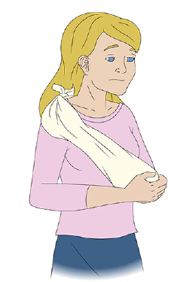
- Use a sling to support the arm and hand if you are transporting the casualty.
First Aid for a Pinched Fingernail
When a finger or toenail has been pinched, sometimes called a nail bruise, the pressure from the blood under the nail can cause great pain. You can relieve this pain as follows:
- Place the injured part under cool running water to reduce pain and swelling.
- If the pain is severe, and you can see pooled blood under the nail, release the pressure under the nail as follows:
- Straighten a paper clip or blunt wire and heat one end to red-hot, using a stove element or the flame from a lighter. Don’t use a needle, the hole it makes is too small to release the pooled blood effectively.
- Place the heated end of the paper clip on top of the nail and let it melt a hole just deep enough to release the pooled blood.
- Once the pressure has been released, wash the area with water and put on an adhesive dressing.
- Advise the casualty to seek medical help if signs and symptoms of an infection develop.
First Aid for Splinters and Slivers
Slivers are small, embedded objects, such as wood, thorns, glass, or metal. This type of injury is common in the hands and feet. Although slivers may cause discomfort and pain, in most cases they can be removed easily without complications. In serious cases, slivers can be disabling and cause infection. Do not remove a sliver if it:
- Lies over a joint
- Is deeply embedded into the flesh
- Is in or close to the eye
- Has a barb (e.g., metal slivers and fishhooks)
- Cannot be removed easily
In these cases, give first aid for an embedded object.
Removing slivers
To remove a sliver, perform the following steps:
- Clean the area with water.
- With sterile tweezers, grip the sliver as close to the skin as possible.
- Pull the sliver in a straight line in the opposite direction to the angle of entry.
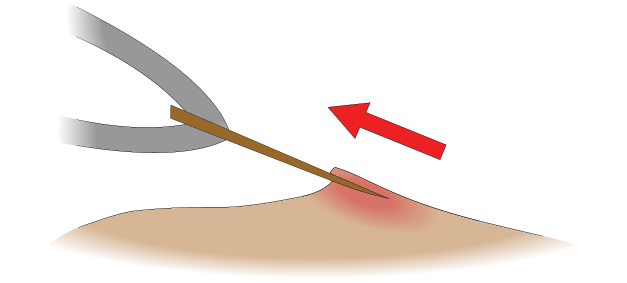
- Get medical help if some of the sliver was not removed, there is more tissue damage than a simple, small puncture wound, or if an infection develops.
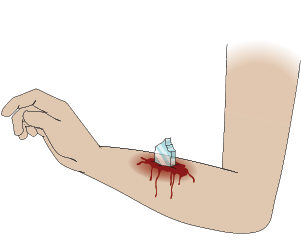
First Aid for Puncture Wounds
Puncture wounds are serious because of the possibility of serious internal damage and contamination carried deep inside the wound.
To give first aid for a puncture wound, perform the following steps:
- Perform a scene survey. The mechanism of injury is important.
- Perform a primary survey.
- Expose the wound. Although there may not be much external bleeding, you should suspect internal bleeding, especially if the wound is in the chest or abdomen.
- Control bleeding with direct pressure on the wound.
- Get medical help.
- Give ongoing casualty care until handover.
First Aid for Embedded Objects
If possible, do not remove an object embedded in a wound. Removing the object will probably result in heavier bleeding, as the object can help stop bleeding.
Removing it could also cause further tissue damage, for example, a barb on a fishhook.
To give first aid for an embedded object, perform the following steps:
- Expose the injured area and assess the wound.
- Check the circulation below the injury.
- To stop the bleeding, put pressure around the embedded object. If the embedded object is short, “tent” a clean dressing loosely over the object to keep the wound clean, then place bulky dressings around the object to keep it from moving. This will apply pressure around the wound.
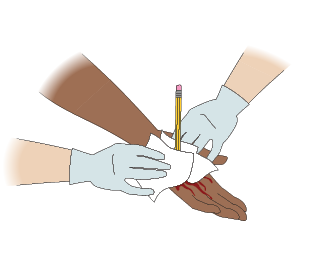
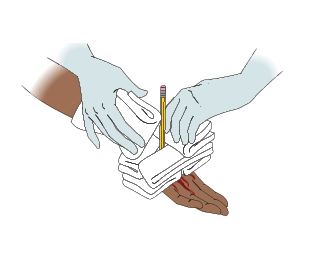
- Secure the bulky material (dressings) in place with a narrow bandage, taking care not to exert pressure on the embedded object.
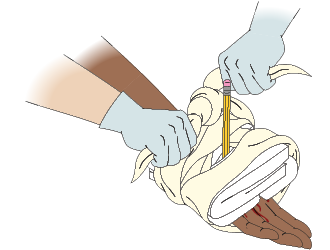
- Check the circulation below the injury again.
- Give ongoing casualty care and get medical help.
First Aid for a Nosebleed
A nosebleed may start for no obvious reason, or may be caused by blowing the nose, an injury to the nose, or by an indirect injury, such as a fractured skull.
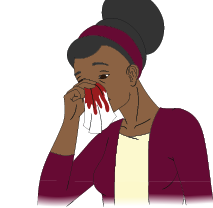
To give first aid for a nosebleed, perform the following steps:
- Perform a scene survey and assess the mechanism of injury. If you suspect a head or spinal injury, tell the casualty not to move. Perform a primary survey.
- Assess the bleeding from the nose. If the blood from the nose is mixed with straw-coloured fluid, suspect a skull fracture. Allow the nose to bleed and give first aid for a skull fracture (refer to Skull Fractures in Chapter 10).
- If a head or spinal injury is not suspected, place the casualty in a sitting position with the head slightly forward. Leaning forward allows blood to drain from the nose and mouth instead of back into the throat and stomach, where it will cause vomiting.
- Tell the casualty to compress the entire fleshy part below the bridge of the nose firmly with the thumb and index finger for about 10 minutes or until bleeding stops.
- Tell the casualty to breathe through the mouth and not blow their nose for at least a few hours, preferably 48 hours. This will help with healing and keep blood clots from being disturbed.
If bleeding does not stop with this first aid, or if it starts again, get medical help.
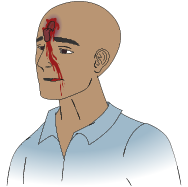
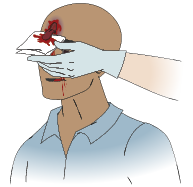
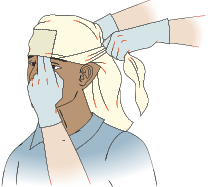
First Aid for Bleeding from the Scalp
Bleeding from the scalp is often severe and may be complicated by a fracture of the skull or an embedded object. Avoid direct pressure, probing, and contaminating the wound.
To give first aid for bleeding from the scalp, perform the following steps:
- Perform a scene survey and a primary survey.
- Apply a thick, sterile dressing and bandage it firmly in place with a head bandage.
- If there is a suspected underlying skull fracture, give first aid for a fracture of the skull.
- If there is an embedded object, apply dressings around the object to maintain pressure around but away from the wound.
- Give ongoing casualty care.
First Aid for Bleeding from the Ear
Do not try to stop the bleeding from the ear canal by placing pressure on the ear or by packing it with dressings. To reduce the risk of infection inside the ear, it is best to let the blood drain away.
To give first aid for bleeding from the ear, perform the following steps:
- Perform a scene survey and assess the mechanism of injury. If you suspect a head or spinal injury, tell the casualty not to move. Perform a primary survey.
- Assess the bleeding from the ear. If the blood from the ear is mixed with straw-coloured fluid, suspect a skull fracture. Steady and support the head and neck. Place a dressing lightly over the ear and give first aid for a skull fracture. The dressing will absorb the blood and protect the wound.
- If a head or spinal injury is not suspected, lightly tape a dressing over the ear. Position the casualty to allow the blood to drain from the ear if injuries permit. If the casualty is unconscious and injuries permit, put dressings over the ear and place them in the recovery position with the injured side down.
- Give ongoing casualty care.
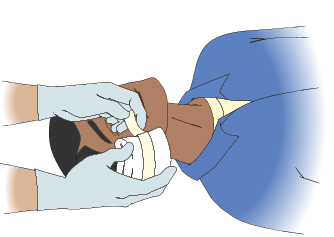
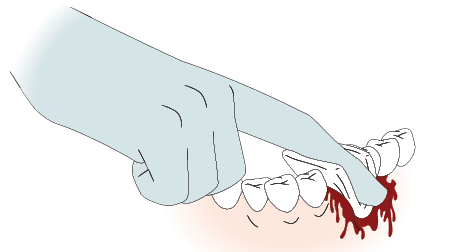
First Aid for a Knocked-Out Tooth
A knocked-out tooth can be re-implanted if the casualty receives medical/dental help quickly.
To give first aid for a knocked-out tooth, perform the following:
- Perform a scene survey and assess the mechanism of injury. If you suspect a head or spinal injury, tell the casualty not to move. Perform a primary survey.
- Apply direct pressure to stop the bleeding from the socket of the tooth. Seat the casualty with their head forward so blood can drain out of their mouth.
- Give ongoing casualty care.
Place the knocked-out tooth into one of the following (listed from most preferred to least preferred) to protect the tooth and root until it can be re-implanted:
- Balanced salt solution (such as oral rehydration salt solutions (ORS) available from pharmacies and is used to treat dehydration due to diarrhea, Hank’s Balanced Salt Solution (HBSS) available through medical supply companies. Consider having this substance on hand if you are involved with an activity where there is a high chance of a knocked-out tooth.
- Propolis, also known as bee glue. Usually available in health food stores. The concentration should be 0.04 to 2.5 mg of 0.4% ethanol per ml.
- Egg white
- Coconut milk
- Ricetral
- Whole milk
- Saline
- Phosphate buffered saline
- The casualty’s own saliva
Do not use tap water, coconut water, skim milk, buttermilk, egg whites, castor oil, or turmeric extract. These do not provide suitable protection for the tooth and may cause damage.
For reimplantation of a knocked out tooth, the casualty must seek urgent care from a dentist, not an emergency room. However, if the injury is an isolated dental injury and there are no concerns about brain, facial, neck or other injuries, seek the care of a dentist.
First Aid for Bleeding from the Mouth
When there is bleeding from the gums or mouth, first assess the mechanism of injury to determine if there is a chance of a serious head and/or spinal injury. Make sure the bleeding in the mouth doesn’t block the airway.
Control the bleeding in the mouth using direct pressure over a clean, preferably sterile, dressing. Do not wash out the mouth after bleeding has stopped, as this may dislodge clots and cause bleeding to start again.
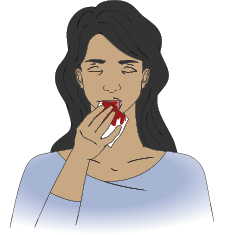
The casualty may suck on an ice cube or a Popsicle to help control swelling.
 |