BLS+CPR for Healthcare Providers
Artificial Respiration (AR)
Artificial respiration (AR) is a way you can supply air to the lungs of a casualty who is breathing ineffectively or not breathing at all but has an adequate pulse. Pulse/breathing checks should be performed every two minutes for at least 5 seconds but no longer than 10 seconds.
The methods for ventilating a non-breathing casualty are:
- Mouth-to-mask with supplemental oxygen
- Two-rescuer bag-valve mask
Infants and children with a pulse rate of less than 60 beats per minute and who show signs of poor perfusion despite oxygen and ventilation should receive chest compressions in addition to ventilations.
AR can be given in a wide range of situations. In an emergency situation, keep the following in mind:
- You can start AR right away in any position (but it is best if the casualty is on their back on a firm, flat surface).
- You can continue AR while the casualty is being moved to safety by other rescuers.
- You can give AR for a long time without getting too tired.
- AR techniques can be used to help a casualty with severe breathing difficulties.
In some situations, giving AR may be more difficult than in others. Some examples are:
- When severe injuries to the mouth and nose prevent a good seal around the mouth.
- When blood and/or other body fluids drain into the throat and block the airway, do your best to drain the mouth prior to beginning AR.
- The casualty has been poisoned by a toxic gas like hydrogen sulphide and coming in contact with the casualty may result in you being poisoned.
- The casualty has a corrosive poison on their face or in their mouth, and you don’t have a face mask.
When this happens, you have to do the best you can (based on your level of training) without putting yourself into danger.
Opening the Airway
Healthcare providers will primarily open a casualty’s airway using the head-tilt/chin-lift, except in cases where a spinal injury is suspected.
In those cases, a jaw thrust is used. In the event that a spinal injury is suspected and the jaw thrust does not work, use a head-tilt/chin-lift to open the airway.
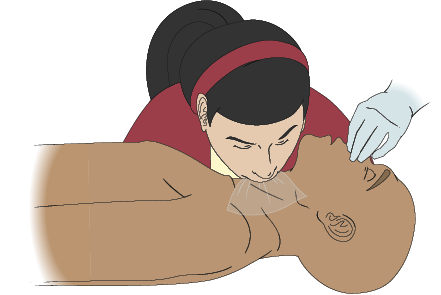
Using a jaw thrust method
To use the jaw thrust method, perform the following steps:
- With the head and neck supported, position your hands on either side of the head.
- Steady your thumbs on the casualty’s cheekbones. Grasp the angle of the jaw with your middle, ring and little fingers and lift to open the airway.
- If necessary, open the mouth using the index fingers.
- Check for signs of breathing and a pulse for at least 5 and up to 10 seconds while holding the airway open with the jaw thrust.
- If there is a pulse, but no breathing, position the mask over the casualty’s face. Blow into the casualty’s mouth and watch for the chest to rise. Keep lifting the jaw to hold the airway open.
- If there is no pulse, begin compressions and continue CPR until an AED arrives on the scene.
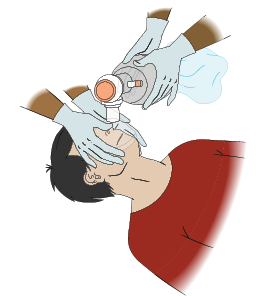
Using a pocket mask
A pocket mask is used to deliver artificial respiration, while providing some protection to the responder as well.
The pocket mask should be positioned over the mouth and nose, with the lower, wider end placed approximately one finger’s width above the chin.
Using a bag-valve mask (BVM)
A bag-valve-mask (BVM) is a self-inflating bag with a one-way valve that a face mask can be attached to. The BVM will also accept an oxygen reservoir bag. The bags come in three sizes: adult, child, and infant.
A BVM is also used to deliver artificial respiration. It is recommended that the BVM be used with two responders.
To use a BVM, perform the following steps:
- Open and secure the casualty’s airway.
- Select the correct sized mask based on the casualty’s size (adult, child or infant)
- Create a C grip on the mask by positioning your thumbs over the top of the mask and your index and middle fingers over the bottom half of the mask.
- Make sure the mask fits properly by aligning the apex of the mask with the bridge of the nose and the lower end of the mask just below the mouth on the chin. Make sure to center the ventilation port, if your mask has one, to the center of the mouth.
- Place your ring fingers and pinky finger at the corner of the jaw just below the ear and perform a jaw thrust.
- Instruct a second rescuer to squeeze the bag every three to six seconds, depending on the casualty, with two hands, providing only enough air to make the chest rise.
Using advanced airways with masks
When using a pocket or bag valve mask, using an advanced airway is recommended. This involves advanced skill training. If an advanced airway is not available or you are not trained on how to use it, this does not preclude you from using a pocket mask or BVM. Using one or the other without an airway is acceptable. The healthcare professional may be asked to assist with the bag valve mask when an advanced responder has inserted an advanced airway. Adjunct airways (oral or nasal) may be necessary in conjunction with bag-valve mask if the casualty is unresponsive.
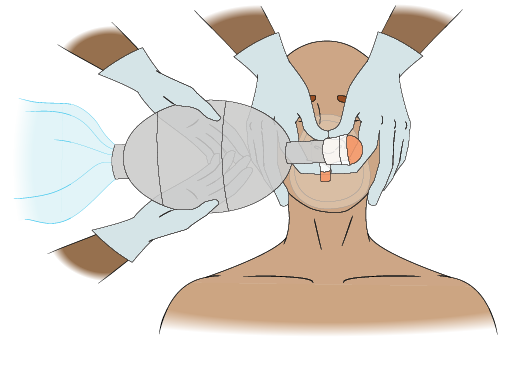
Adult AR: Two-Rescuer BVM
To provide two-rescuer BVM for an adult, perform the following steps:
- One rescuer positions themselves at the casualty’s head, and places the mask on the casualty’s face.
- Using the thumb and first finger of EACH hand around the valve in a “C” position, the rescuer presses the mask against the casualty’s face.
- Using the remaining fingers of EACH hand in an “E” position, the rescuer lifts up on the jaw and tilts the head back to open the airway.
If the casualty has a suspected head/spinal injury, use a jaw thrust. - The second rescuer will squeeze the bag to ventilate. Give each breath every 5 to 6 seconds. Ensure the chest visibly rises.
- Check the pulse approximately every 2 minutes.
Child AR: Two-Rescuer BVM
To provide two-rescuer BVM for a child, perform the following steps:
- One rescuer positions themselves at the casualty’s head, and places the mask on the casualty’s face.
- Using the thumb and first finger of EACH hand around the valve in a “C” position, the rescuer presses the mask against the casualty’s face.
- Using the remaining fingers of EACH hand in an “E” position, the rescuer lifts up on the jaw and tilts the head back to open the airway. If the casualty has a suspected head/spinal injury, use a jaw thrust.
- The second rescuer will squeeze the bag to ventilate. Give each breath every 3 to 5 seconds. Ensure the chest visibly rises.
- Check the pulse approximately every 2 minutes.
Infant Artificial Respiration: Two-Rescuer BVM
To provide two-rescuer BVM for an infant, perform the following steps:
- One rescuer positions themselves at the casualty’s head and places the mask over the nose and mouth. Do not cover the eyes or chin.
- Using the thumb and first finger of EACH hand around the valve in a “C” position, the rescuer presses the mask against the casualty’s face.
- Using the remaining fingers of EACH hand in an “E” position, the rescuer lifts up on the jaw and tilts the head back to open the airway. If the casualty has a suspected head/spinal injury, use a jaw thrust.
- The second rescuer will squeeze the bag to ventilate. Give 1 breath every second. Ensure the chest visibly rises.
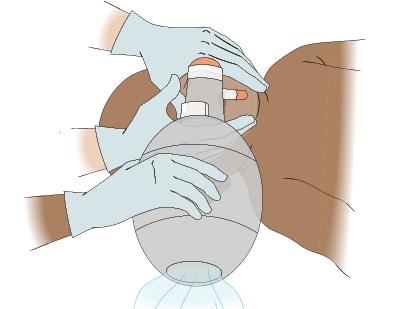
- Give 1 breath every 3 to 5 seconds (12 to 20 per minute).
- Check the pulse approximately every 2 minutes.
Assisted Breathing
Assisted breathing helps a casualty with severe breathing difficulties breathe more effectively.
In a clinical setting, you may have access to a Continuous Positive Airway Pressure (CPAP) machine. It is most useful when the casualty shows very little or no breathing effort. If breathing effort is good, the casualty will likely breathe better on their own. Start assisted breathing when you recognize the signs of severe breathing difficulties.
The technique for assisted breathing is the same as for artificial respiration, except for the timing of the ventilations. If the casualty is breathing too slowly, give a breath each time the casualty inhales, plus an extra breath in between the casualty’s own breaths. Give one breath every five seconds for a total of 12 to 15 breaths per minute.
If the casualty is breathing too fast, give one breath on the casualty’s every second inhalation. This will hopefully slow down the casualty’s own breathing. Give a total of 12 to 15 breaths per minute.
If the casualty is conscious, explain what you are going to do and why. Reassure the casualty often and encourage them to try to breathe at a good rate with good depth.
Be sure to watch the chest during ventilation. The chest should rise with each breath if the breath is effective.
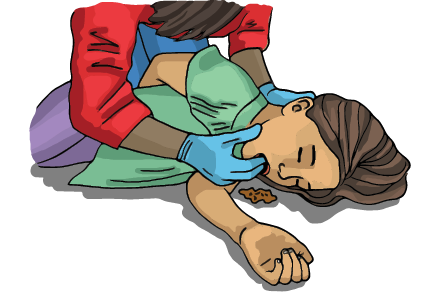
Giving AR to a Casualty who Breathes Through a Stoma
Some people breathe through an opening at the base of their neck. This opening, called a stoma, is the result of a previous medical operation called a laryngectomy.
You may not know someone breathes through their neck when you try to give AR. If the air seems to go down the airway when you blow, but the chest does not rise, check their neck for a stoma. You may also hear air coming out of the stoma as you blow.
Giving AR to a casualty with a stoma
The first aid rescue sequence does not change. Once you identify that a casualty breathes through a stoma, perform the following steps:
- Expose the entire neck and remove all coverings over the stoma. If there is a tube coming out of the stoma, do not remove it.
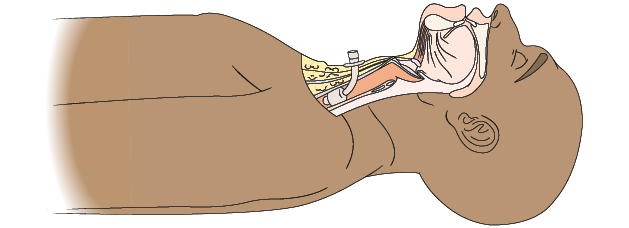
- Place a pad under the shoulders to keep them slightly elevated (if you have one close by).
- Keep the head in line with the body and keep the chin raised.
- Seal the mouth and nose with the hand closest to the head.
- Seal your face shield or your pocket mask over the stoma, or connect your BVM to the tracheostomy tube, and ventilate.
- Watch the chest rise (look, listen, and feel for air movement).
- Let the air escape from the stoma between breaths.
- Maintain a clean air passage, using a cloth to clean the opening; never use paper tissues.
Gastric Distension
If you blow into a casualty too fast or too hard, air may be bypassed into the stomach, causing it to fill with air and become bloated. This is called gastric distension, and it can make it harder to ventilate the casualty and increase the chances that the casualty will vomit. If the stomach becomes distended, try to prevent further distension by:
- Repositioning the head and opening the airway again
- Blowing more slowly, with less air
- Making sure the airway is held fully open
It is unusual, but the stomach can become so distended that the lungs cannot expand. In this case, the air you blow won’t go into the lungs, so you have to relieve the gastric distension by forcing the air out of the stomach. Only relieve gastric distension when the lungs cannot expand and AR is ineffective.
To prevent gastric distension:
- Give breaths at the recommended rate:
- Adults – One breath every 5 to 6 seconds.
- Children and infants – One breath every 3 to 5 seconds.
- Only blow enough air to make the chest rise.
- Make sure the airway is fully open. Keep the head tilted well back (but not over-extended).
 |